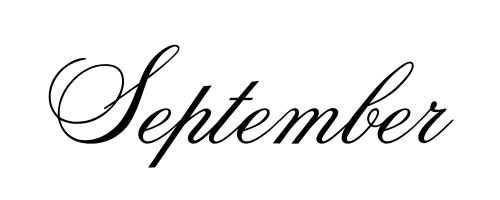
As leaves begin to turn, “September” in cursive reflects the transition with its intricate design. This month’s name offers a delightful journey through varied cursive patterns. Join me, and together we’ll usher in the autumn with style.
How to Write September in Cursive
Writing “September” in cursive involves a series of graceful loops and curves. Here’s a step-by-step guide on how to craft “September” in cursive:
S: Start with the uppercase “S”. Begin slightly above the midline and curve to the left. Swing the curve down and to the right, moving past the baseline, and then curve it upward to the midline, preparing to connect to the next letter.
e: Connect from the “S” by curving slightly upward and then descending to the baseline. Create a loop that swings back up near the midline and then descends in a semi-circle motion.
p: Connect to the “e” by curving upward slightly, and then swing downward past the baseline to form the long downstroke of the “p”. Create a loop that arcs back up to the midline and then swings down, touching the baseline, setting up the connection to the next letter.
t: Connect from the “p” with a short upward curve. Then, create a tall vertical line that starts above the midline and extends down to the baseline. Cross the “t” near the top with a horizontal line.
e: Start the “e” by moving slightly upward from the baseline, then curve down to the baseline. Create a loop that swings back up near the midline and then comes down in a semi-circle motion.
m: Connect from the “e”. Start by going slightly upward, then curve above the midline and descend to the baseline. From there, make a loop that arcs back up to the midline and descends down, followed by another similar loop. This creates the two humps of the “m”.
b: Connect to the “m” by moving upward slightly and then descending below the baseline to form the body of the “b”. Swing back up and create a loop that extends to the midline and curves back down, connecting to the baseline.
e: Start by moving slightly upward from the baseline, then curve down to the baseline. Create a loop that swings back up near the midline and then comes down in a semi-circle motion.
r: Connect from the “e”. Begin by moving slightly upward from the baseline, then create a downward curve that touches the baseline. Curve gently back up, but not as high as the midline, to finish the word “September”.
When learning to write “September” in cursive, practice makes perfect. Start by practicing each letter individually. Once you’re comfortable with the forms, practice connecting them smoothly. If you’re a visual learner, consider referencing images or videos of “September” written in cursive for further clarity.