Quick Links: May in Cursive Tutorial, Worksheets & Printables
Simplicity shines with “May”—a month that’s brief in name but vast in its cursive elegance. This tutorial will guide you through the gentle arcs and connections that make May a joy to write. Let’s immerse ourselves in the beauty of brevity.
How to Write May in Cursive
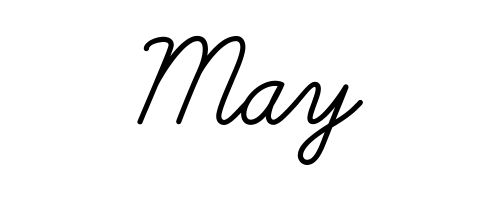
“May” in cursive is relatively straightforward with its concise length. Here’s a step-by-step guide on how to craft “May” in cursive:
M: Begin with the uppercase “M”. Start at the baseline and move upward above the midline. Create a downward curve to the baseline, followed by a smaller upward arc reaching about midline. Then, descend again to the baseline and rise above the midline once more. This creates the distinctive triple peak of the “M”. As you finish the “M”, slightly curve upwards to prepare for the connection to the next letter.
a: Connect from the “M” by curving upward slightly, then descending down to the baseline. Create a loop that goes back up to the midline and then curves down again, forming the body of the “a”.
y: Connect from the “a”. Start by making a curve that rises slightly and then descends smoothly below the baseline. Once below the baseline, gracefully arc the tail of the “y” to the right, forming its signature hook. The tail should dip well below the baseline.
To master “May” in cursive, begin by practicing each letter individually to ensure familiarity with their shapes. Once you feel confident with each character, practice connecting them to form the word. As always, if you’re a visual learner, referencing images or videos of “May” in cursive might be beneficial for a clear visual guide.